The Record Immunizations screen is used to individually finalize the information that will be recorded for each new and/or historical immunization selected.
This screen provides a separate layout for customizing the information on each individual new or historical immunization, as well as displaying client information.
Client Information
The Record Immunizations screen displays a client information header titled Client Information at the top of the page. This header
includes client demographics, selected tracking schedule, a scrolling list of client comments, as well as other client-distinct information.
The 'New Immunizations' section holds separate information on each new immunization selected. The information listed for each immunization is described below.
Field Name
Description
Date Provided
This field allows you to set the date when the immunization(s) was given to the client. Set this field by typing in a new date in the text box in the format MM/DD/CCYY
, or click on the calendar icon to set the date.
Note:The date provided for new immunizations will always be the same date for the new immunizations you are adding. If you have other immunizations from your inventory given on different dates, they will need to be added individually by date.
Ordering Authority
This field allows you to change the ordering authority clinician for the immunization(s). To change the ordering authority, select the desired name from pick list or scan a barcode for another ordering authority on a Barcode Report.
Remove Checkbox
Click the Remove Checkbox if you do not wish to add a selected vaccine. After the remaining required immunization information is entered and the OK button is clicked, the vaccine selected to be removed will not be added to the client’s record.
Immunization
This field displays the vaccine group code of the selected immunization and is a non-editable field.
Trade Name-Lot
This field gives the trade name, vaccine lot number, and funding source of the immunization received. Choose a combination of the above three fields by selecting the appropriate grouping from the pick list or scan a barcode on a vaccine package
or a vial/syringe. Alternatively, you can scan a barcode for a trade name/lot on a Barcode Report.
Dose
This field allows you to select the dose magnitude of new immunizations. Choose a dose magnitude by selecting the desired magnitude from the pick list. The default for all new immunizations is Full.
Administered By
This field allows you to change the administering clinician for each individual immunization. To change the clinician, select the desired name from pick list or scan a barcode for another clinician on a Barcode Report.
Body Site
This field denotes where on the clients body the immunization was given. This is also a CDC-specified list. Choose a body location by selecting the desired name from the pick list or scan a barcode for a body site on a Barcode Report.
Dose Eligibility
This field allows you to select how the client is covered for the selected immunization from a CDC-specified list. The default value for this field is determined by the Client-level eligibilit(y/ies) associated with the currently selected
client. Choose an eligibility by selecting the desired eligibility name from the pick list or scan a barcode for a dose eligibility on a Barcode Report.
Immunization Route
This field allows you to select the route of the immunization from a CDC-specified list. Choose a route by selecting the desired route name from the pick list or scan a barcode for an immunization route on a Barcode Report.
VIS Date
This field allows you to change the default VIS date. Choose a different VIS date by selecting it from the pick list or scan the barcode on the VIS. If there is no VIS date, the text "No VIS Date" will display. See "VIS Dates
For New Immunizations" below for more information.
The 'Historical Immunizations' section holds separate information on each historical immunization selected. The information contained for each is described below.
Field Name
Description
Remove Checkbox
Click the Remove check box if you do not wish to add a selected vaccine. After the remaining required immunization information is entered and the OK button is clicked, the vaccine selected to be removed will not be added to the client’s record.
Immunization
This field displays the vaccine group code of the selected immunization and is a non-editable field.
Date Provided
This field allows you to set the date when each individual immunization was given to the client. Set this field by typing in a new date in the text box in the format MM/DD/CCYY
, or click on the calendar icon to set the date.
Trade Name
This field allows you to select a trade name for the immunization received, if available. Choose a trade name by selecting the name from the pick list. If the trade name is not known, select 'Unknown'.
Lot Number
This field allows you to enter a lot number for the immunization received, if available. Type the lot number into the text box, or if the lot number is unknown, leave it blank.
Provider Org
This field allows you to enter a provider organization for the immunization received. Type the organization's name into the text box, or, if the organization's name is unknown, leave it blank.
To accurately reflect the VIS date of the form given to the client/parent, this section displays to the user the current VIS to be saved with the immunization record for each antigen. Based upon your selection of 'Trade Name-Lot' the VIS Dates For New Immunizations section will be populated with the corresponding VIS information for the antigen chosen. If the VIS you are giving is not the default, choose the correct VIS date from the pick list or scan the barcode on the VIS. If the VIS date is for a multi-vaccine
VIS, it will show all the associated vaccine groups to the right of the VIS date in the pick list. You can also edit the VIS date on the Edit Immunization screen on the same day it is entered.
Functionality
When entering immunizations the Ok and Cancel buttons at the top and bottom of the screen can be used.
Button
Description
After all information has been entered for each individual immunization selected to record, click on the Ok button to save the immunizations to the database. The registry will perform data checks
to ensure enough relevant information was entered for each immunization before saving. If critical information is missing or invalid, you will be prompted to fix the error before continuing.
If the Cancel button is clicked, any changes or updates made to the information on the Record Immunizations screen will be
lost, and you will be returned to the Pre-select Immunizations screen.
If a signature pad is connected and installed, and there is at least one inventory immunization, this button will be available. Clicking on Get Signature(s) will send the inventory immunization information and VIS dates to the signature pad.
Patients or their authorized responsible person can review the client comments, immunizations, and sign. They have the option of refusing to sign by tapping the SKIP button on the signature pad. The signature pad will require the administering
clinicians and ordering authorities' signatures if one hasn't been entered. By using the signature pad a Vaccine Administration Report will be generated with the signatures. This report will be available to your organization and
child organizations to review at any time from WIR.
Barcode Scanning
If you navigated to this screen by scanning a barcode on a vaccine from inventory, the Trade Name-Lot for the scanned vaccine will display the information you scanned and will be read only.
You can scan additional barcodes for vaccines regardless of whether a row for the corresponding immunization group is displayed on the screen.
If the scanned barcode applies to an immunization group already displayed on the screen, the system will populate the Trade Name-Lot with scanned information regardless of whether it is blank or filled in. If the field is editable, it will
become read-only.
Otherwise, the system will add a row and will populate the Trade Name-Lot field with scanned information; this field will be read-only.
If you successfully scan a barcode for an ordering authority, the system will fill in the Ordering Authority value. You can override the value manually or by scanning a barcode for another ordering authority if needed.
If you successfully scan a barcode for a clinician, the system will fill in the Administered By value for the last immunization scanned; this value will become the new Administered By default for any additional vaccine lots scanned until you
successfully scan a barcode for another clinician. You can override the value manually or by scanning a barcode for another clinician if needed.
If you successfully scan a barcode for a body site, the system will fill in the Body Site field for the last immunization you scanned; you can override the value manually or by scanning a barcode for another body site if needed. Filling in the
Route field will behave similarly.
If you successfully scan a barcode for a dose eligibility, the system will populate the Dose Eligibility field for the last immunization you scanned; you can override the value manually or by scanning a barcode for another dose eligibility if
needed. If a new row is added for a scanned vaccine lot, Dose Eligibility will default to the value from the line item above it.
If you successfully scan a barcode for a Vaccination Information Sheet (VIS), the system will populate the VIS Date field for the Vaccine Group(s) displayed that is/are associated with the VIS. You can override the value manually or by scanning
a barcode for another VIS if needed.
Barcode scanning is supported for new immunizations using vaccine lots from inventory. It is not supported for historical immunizations, or vaccine lots that have not been entered in inventory.
This screen supports barcode scanning for ordering authorities, administering clinicians, body sites, immunization routes, dose eligibilities, vaccine information sheets and non-expired vaccine lots from inventory. In other cases, the system
will regard the barcode as invalid.
If you scan an invalid barcode or if the scanner is unable to read the barcode, the system will display an error message specific to the issue encountered and will ignore the scan. If this happens, you can record the information manually, unless
the error message asks you to contact the WIR Help Desk or the expiration date for the vaccine lot has passed.
After you enter immunizations and click the OKbutton, the system will attempt to find potentially duplicate immunization records. Two immunizations which have overlapping vaccine groups and are administered to the same client within a two day window of each other are potentially duplicate immunization records. The system will attempt to automatically resolve some cases of duplicate immunizations, but if it cannot, then the system displays the Duplicate Immunization Override screen and asks the user to make a choice.
Automatic Resolution Example:Suppose you enter a historical dose of Hib with trade name ActHib and lot number 123456, which matches an existing immunization of Hib for the client on the same date with the same trade name and lot number. The system determines this is an exact duplicate and automatically discards the immunization you are attempting to save.
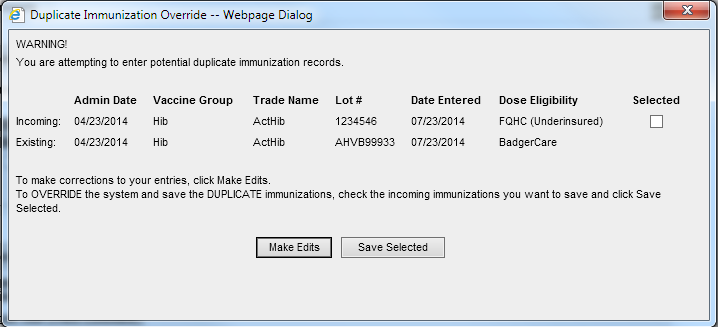
Duplicate Immunization Override Example:Suppose you enter a historical dose of Hib with trade name ActHib and lot number 123456, which matches an existing immunization of Hib for the client on the same date with the same trade name, but the lot number is different. The system won't automatically resolve this because the difference in lot number could be significant. The system displays the Duplicate Immunization Override screen as below:
When the Duplicate Immunization Override screen displays, follow these steps:
Review the list of potentially duplicate immunization records. Incoming immunizations are ones which you have just entered on the Record Immunization screen and are attempting
to save. Existing immunizations are ones which have previously been saved to the client's record.
If you have made an error in entry and want to return to the Record Immunization screen, click the Make Edits button.
If you are sure you want to save one or more of the duplicate immunization records, check the check boxes for the incoming immunizations you truly wish to save. Click theSave Selectedbutton. The system will save the incoming immunizations you have checked. The ones you have not checked will be discarded.
Note:The two-day window for identifying potentially duplicate immunizations expands to a four-day window in the case of immunizations given in Medicaid or WIC organizations.